Yawn,, sudah mengantuk tapi masih saja ingin blogging .hehe langsung saja deh ntar malah ketiduran lagi -_-

Sesuai dengan judulnya Create Your Own "Shutdown Animation" (Android), disini saya akan berbagi ilmu (wew) tentang bagaimana untuk menambahkan Animasi saat android kita di Shutdown maupun di Reboot.. Tapi tutorial yang ini hanya buat pengguna Xperia ya, karena ane cuma punya satu robot hijau itu saja :|

Pertama sediakan dulu file dengan format .mp4 (di sarankan gak lebih dari 10 detik, soalnya ntar malah frustasi nungguin shutdown nya lama :v )

Karena saya menggunakan device yang HDPI maka saya menyiapkan satu buah file video.mp4 dengan resolusi 480x854 agar nanti terlihat nya pas :D
*Untuk edit video ane biasa pake Camtasia Studio aja yang simple*

Beri nama file tersebut dengan shutdown.mp4

Setelah itu download flashable .zip yang sudah saya sediakan disini *click to download (ini sudah berisi shutdown animation SONY)

Lalu buka file .zip hasil download tadi dengan winrar atau temannya, buka folder
system  etc  customization  content  com  sonyericsson  shutdownanim
Ganti file "shutdown.mp4" dengan yang sudah disiapkan tadi (dengan cara drag & drop)

Lalu copy file zip tersebut ke SDcard, dan tinggal di flash saja via CWM
Selesai, mudah kan?

nih HASILNYA punya ane gan :v


Untuk pengguna SAMSUNG ane nemu satu thread yang mungkin bisa membantu..
silahkan cek di http://forum.xda-developers.com/showthread.php?p=35825846#post35825846

Semoga bermanfaat ;)

Hello, kali ini saya mau berbagi tutorial cara mengedit Notifikasi Baterai di Android apabila sudah lemah (biasanya saat 15% akan muncul notifikasi tersebut)
Untuk lebih jelasnya bisa lihat SS d bawah ini

 #LOL

Ok langsung saja caranya, pertama download dulu bahan2 yang di gunakan

1) Apk Editor *click to download
2) RootEx *click to download
Jangan lupa di install :p


Lalu langkah-langkahnya
0) ALWAYS DO WITH YOUR OWN RISK

1) Buka RootEx, masuk ke directory system root, jgn lupa mount as r/w


2) Masuk ke system/app cari SystemUI.apk lalu tekan+tahan (hold) pilih Extract All, lalu close saja RootEx nya


3) Sekarang buka ApkEditor, cari folder hasil ekstrak-an SystemUI tadi, lalu klik resources.arsc


4) Lalu klik [strings] yang di pojok kanan bawah lalu pilih string


5) Sekaramg edit notifikasi nya dengan kata-kata yang kita inginkan


6) Jika sudah tekan tombol back, ketika ada konfirmasi save maka pilih OK, dan ketika muncul pilihan update changes to dictionary pilih Cancel, close ApkEditor nya


7) Lalu hapus file resources.arsc.bak


8) Next, buka RootEx lagi, cari folder ekstrak-an tadi, lalu buka folder SystemUI/res/drawable-hdpi cari file battery_low_battery.png nah ganti file ini dengan yang anda inginkan, INGAT file harus berupa .png, untuk resolusinya saya menggunakan 300x233 (Width x Height)

*contoh file battery_low_battery.png punya saya (300x233)


9) Kembali ke folder utama SystemUI, tap menu, pilih multi-select, lalu centang semuanya, stelah itu klik Zip, beri nama SystemUI.apk


10) Masuk ke folder hasil zip tadi akan ada file SystemUI.apk.zip, rename dan hapus .zip nya saja menjadi SystemUI.apk


11) Lalu copy file SystemUI.apk tersebut ke system root pada folder system/app (lihat no 1), timpa file sebelumnya lalu ubah permission menjadi rw-r-r


12) Reboot, Enjoy :D
13) Hasilnya? lihat lagi ke paling atas :v

IMPORTANT
bagi yang hang di step no 10 saat menimpa file SystemUI.apk yang lawas, matikan saja HH nya/restart, lalu masuk lagi ke folder system/app stelah itu ganti permissions lagi menjadi rw-r-r lalu reboot lagi..
It should be work!

Cara Aman
Walau sedikit ribet dan memerlukan bantuan PC tapi cara ini cukup aman..
Setelah selesai mengedit SystemUI nya (step no 10) jika tidak ingin mengalamai kendala hang seperti yang saya bilang di atas (IMPORTANT) tadi, yaitu dengan menginstall SystemUI melalui CWM
download flashable .zip nya disini *click
Lalu buka file .zip tersebut, buka system  app  DRAG n DROP file SystemUI.apk td *lihat pada gambar


lalu flash file zip tsb melalui CWM.. Good Luck! :D


*jika ada yg punya ApkEditor versi FULL dan work 100%, ane bagi ya gan :v


special thanks to
Ruly Setyawan and Tubagus Dhika Khameswara
for their great tutorial at https://www.facebook.com/groups/XRay.Indonesia/doc/543442845693625/

Dilarang Copy-Paste konten untuk di share ulang TANPA se-izin penulis!

“Be a Smart & Creative Blogger!”

Copyright © Agung Pambudi
I have re-modded a SystemUI for Xperia 2011 HDPI phone from BDFreak that he has ported and modded the SystemUI v8.1 created by Serajr

So, here is the screenshot


Get it from here https://www.box.com/s/ylc2m3diggeb5ab2sj6v
For best TRANSPARENT EXPERIENCE, you must set the opacity
Open System UI Preferences
==> In the Status Bar tab, set Background Opacity to 90%
==> then in Status Bar Expanded tab, set Notifications Are Opacity to 80%
==> Save and restart, Enjoy....  ;)


My Previous work
JB Transparent SystemUI Blue


Original MOD from BDFreak you can found from here
http://forum.xda-developers.com/showthread.php?t=2223150

Hello, sudah tahu kan salah satu gadget besutan Google yang lagi booming saat ini? yap Google Glass, sebuah kacamata pintar yang memiliki teknologi canggih dengan segudang fitur di dalamnya..


Tapi kita juga tahu harga gadget tersebut bisa di bilang cukup tinggi, yaitu dibanderol sekitar 1.500 dollar AS.. WOW mahal sekali bukan?

Nah beruntunglah bagi para pengguna Smartphone Android, karena ada salah seorang developer bernama Zhuowei Zhang yang baik hati telah memporting beberapa fitur Google Glass menjadi sebuah aplikasi (.apk) yang bisa dijalankan di smartphone Android. Aplikasi berbentuk installer .apk tersebut bisa Anda download secara gratis di situs ini https://github.com/zhuowei/Xenologer

disana terdapat 7 fitur Google Glass yang bisa kita dapatkan, yaitu :
1) Home
2) Camera
3) Bluetooth
4) MyGlass
5) Maps
6) Setup
7) GlassPhotosphere

Untuk menginstall-nya jangan lupa setting dulu pada device Androidnya
Buka Setting  Security  centang pada Unknown sources

Untuk tutorial instalasi secara lengkapnya bisa lihat video berikut ini


Untuk dapat mengakses menu, kita harus menggunakan perintah suara dengan mengatakan "Ok Glass", serta fitur lainnya pun dapat diakses dengan perintah suara seperti berikut ini


Namun namanya juga hanya sebuah simulasi aplikasi ini wajar masih memiliki banyak bugs, sehingga wajar apabila tidak compatible dapat membuat Android Anda "hang" dan terpaksa  perlu di "restart".  

bagaimana, tertarik untuk mencobanya? silahkan di coba sendiri :D
but always DWYOR (Do With Your Own Risk)


semoga bermanfaat ;)

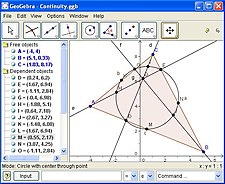
Berhubung ada mata kuliah matematika diskret dimana saya harus menggambar sebuah graf, lalu setelah muter-muter di mbah google ga sengaja nemu aplikasi nya yang bagus nih, sebut saja GeoGebra :D
Langsung saja ya review nya dari Wikipedia ya biar lebih jelas .hehe

GeoGebra


GeoGebra is an interactive geometryalgebra, and calculus application, intended for teachers and students. Most parts of GeoGebra are free software. GeoGebra is written in Java and thus available for multiple platforms. Many parts of GeoGebra have been ported to HTML5 by using theGoogle Web Toolkit.
Its creator, Markus Hohenwarter, started the project in 2001 at the University of Salzburg, continuing it at Florida Atlantic University (2006–2008),Florida State University (2008–2009), and now at the University of Linz together with the help of open-source developers and translators all over the world. Currently, the lead developer of GeoGebra is Michael Borcherds, a secondary maths teacher.
After a successful Kickstarter campaign, GeoGebra plans to expand their offerings to include an iPad and Android version.

Dynamic geometry, algebra and calculus
GeoGebra is dynamic geometry software. Constructions can be made with points, vectors, segments, lines, polygons, conic sections, inequalities, implicit polynomials and functions. All of them can be changed dynamically afterwards. Elements can be entered and modified directly on screen, or through the Input Bar. GeoGebra has the ability to use variables for numbers, vectors and points, find derivatives and integrals of functions and has a full complement of commands like Root or Extremum. Teachers and students can use GeoGebra to make conjectures and to understand how to prove geometric theorems.
It's main features are:
Dynamic Geometry Environment
Built-in CAS
Allows scripting
Built-in spreadsheet with extended skills

Exporting
Constructed projects can be exported in several formats. Dynamic applets can be directly uploaded to GeoGebraTube, exported to html (as a single file suitable for use in a virtual learning environment (VLE), such as Moodle). Possible direct export to HTML5 or Animated GIFSVG vector images can be further edited using third party software, e.g. InkscapeEMF vector formatscan be directly imported in several Office applications. There are also options for exporting to the system clipboard, PNGPDFEPSPGF/TikZ and Asymptote.
GeoGebra can also create code that can be used inside LaTeX files in order to create that same images that GeoGebra generates, through the PSTricks package, the PGF/TikZ packages, orAsymptote code.
GeoGebraTube is the official repository website of GeoGebra products and GeoGebra related free resources. It started working in June 2011, and it contains more than 30 000 (in April 2013) materials, like interactive presentation, games, and lessons made by GeoGebra.

Licensing
Most parts of the GeoGebra program are licensed under GPL and CC-BY-SA, making them free software. However some parts, including the Windows and Mac installers, have a license which forbids commercial use and are therefore not free software. In practice, this means that non-commercial use by teachers and students is always free of charge, while commercial users may need to pay license fees. For details see the GeoGebra license description.
Since July 2010 the Debian Linux distribution offers a free version of GeoGebra in which all unfree parts of the program were removed or replaced by free software. This version may be used for commercial purposes without paying licensing fees. Hovewer, since version 4.2, Geogebra has changed the licence: Geogebra is no more considered free software and versions >= 4.2 are no more included in Debian.


Untuk mendapatkan aplikasinya langsung saja pilih di bawah ini


Semoga bermanfaat :D


SCRIPT CODE


/*
Agung Pambudi (c) 2013
( afh4mz@gmail.com )

Date: 1-06-2013
Description: Deret bilangan Ganjil & Genap dan Jumlah dari deret bilangan tsb
*/

#include<iostream>
using namespace std;

main()
{
    int i, x, batas;
    int jml_ganjil=0, jml_genap=0;
   
    cout<< "Deret Bilangan Ganjil & Genap\n";
    cout<< "Masukkan batasan  : "; cin>> batas;

    cout<< "\nDeret bilangan Ganjilnya adalah \n";
        for(i=1 ; i<=batas ; i=i+2)
        {
            cout<< i <<ends;
            jml_ganjil=jml_ganjil+i;
        }
    cout<< "\nJumlah dari deret Ganjil = " <<jml_ganjil <<endl;

    cout<< "\nDeret bilangan Genapnya adalah \n";
        for(x=2 ; x<=batas ; x=x+2)
        {
            cout<< x <<ends;
            jml_genap=jml_genap+x;
        }
    cout<< "\nJumlah dari deret Genap = " <<jml_genap <<endl;
}
//END

Sekian, semoga bermanfaat :)


SCRIPT CODE

/*
Agung Pambudi (c) 2013
( afh4mz@gmail.com )

Date: 1-06-2013
Description: Program Penjumlahan 2 Matriks Ordo 2x2
*/

#include<iostream>
#include<conio.h>
using namespace std;

int i,x;
int matriks_A[2][2], matriks_B[2][2], matriks_C[2][2];
char ulang;

main()
{
    cout<< "\nPenjumlahan 2 Matriks Ordo 2x2 \n\n";

    do{

        //Input data matriks A
        cout<< "\nData matriks A \n";
            for(i=0; i<2; i++)
            {
                for(x=0; x<2; x++)
                {
                    cout<< "["<<i<<"]["<<x<<"] : ";
                    cin>> matriks_A[i][x];
                }
            }

        cout<< "\n.__________________________________.\n";

        //Input data matriks B
        cout<< "\nData matriks B \n";
            for(i=0; i<2; i++)
            {
                for(x=0; x<2; x++)
                {
                    cout<< "["<<i<<"]["<<x<<"] : ";
                    cin>> matriks_B[i][x];
                }
            }

        cout<< "\n.__________________________________.\n";

        //Output hasil penjumlahan Matriks A + Matriks B
        cout<< "\nMatriks A + Matriks B : "<<endl;
            for(i=0; i<2; i++)
            {
                for(x=0; x<2; x++)
                {
                    matriks_C[i][x]=matriks_A[i][x]+matriks_B[i][x];
                    cout<<"\t"<<matriks_C[i][x];
                }
                cout<<endl;
            }

        cout<< "\n.__________________________________.\n";

        cout<< "\nHitung lagi ? [y/t] : ";cin>>ulang;
    }while(ulang!='t');
    cout<< "\n\nTerima Kasih \n\n"<<endl;
    getch();
}
//END

Sekian, semoga bermanfaat :)

SCRIPT CODE

/*
Agung Pambudi (c) 2013
( afh4mz@gmail.com )

Date: 1-06-2013
Description: Program menampilkan deret bilangan Fibonacci
*/

#include <iostream>
using namespace std;

main()
{
    int x=-1, y=1, z, a, jml;
    cout<< "Jumlah deret Fibonacci = "; cin>> jml;
    cout<< "Deret Fibonacci = \n";
    for(a=1 ; a<=jml; a++)
    {
        z=x+y;
        cout<< z <<ends;
        x=y;
        y=z;
    }
    cout<< endl;
}
//END

Sekian, semoga bermanfaat :)
Ya mungkin sudah banyak yang tahu cara memasang musik di blog, terutama menggunakan layanan gratis dari divine-music.info karena loading musicnya yang cukup cepat dibanding layanan lainnya..
namun dari situs tersebut kita hanya bisa memasang music saja yang autoplay saat page blog kita di buka, dan kita tidak bisa mem-Pause atu men-Stop music tersebut..
Nah kali ini saya akan bagi cara memasang musik di blog dengan tombol Play Pause dan Stop seperti yang bisa kalian lihat di bawah ini (detailnya buka saja blog saya dan scroll ke page paling bawah)


Berikut langkah-langkahnya

1. Buka situs berikut http://divine-music.info/
2. Pilih "Browse All" lalu cari lagu yang kamu inginkan
3. Sebagai contoh saya mengambil lagu Cold Play - Fix You (lihat dan ikuti gambar di bawah)


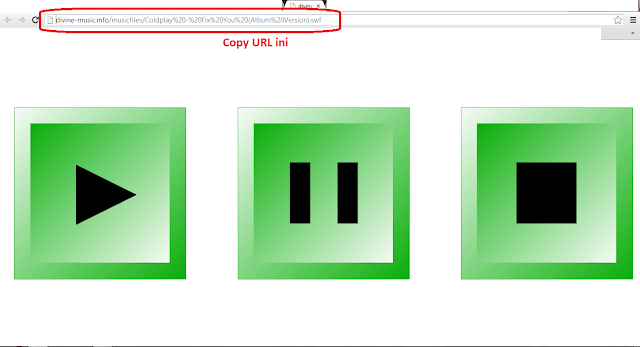
4. Lalu akan terbuka page baru, copy URL nya (lihat gambar berikut)

5. Lalu buka blogger anda -> pilih Tata Letak -> Tambahkan Gadget -> HTML/JavaScript
6. Copy code berikut

<center><iframe frameborder="0" width="150" height="150" src="http://PASTE URL MUSIC DISINI.swf" id="wpcom-iframe-1589d54d376188dbbad6ec99f7d58b66"></iframe></center><center><a href="http://afh4mz.blogspot.com/2013/06/pasang-music-autoplay-di-blog-dengan.html">Music for Blogger by Afhamz</a></center>

7. Lalu ubahlah "http://PASTE URL MUSIC DISINI.swf" dengan URL yang tadi sudah di copy (No. 4)
8. Simpan Gadget nya, lalu cek blog anda :D

Tambahan
Anda bisa juga menggunakan musik sendiri, yaitu dengan convert file .mp3 ke .swf (cari saja software converternya di google) lalu upload lah file tersebut ke akun 4shared anda, contoh link musik Maroon 5 - She Will Be Loved dari akun 4shared saya
http://www.4shared.com/document/1rlsRPaK/Maroon_5_-_She_Will_Be_Loved.html

ubahlah document menjadi embed dan .html menjadi .swf sehingga nanti link yang anda masukkan ke code HTML widget nya seperti ini
http://www.4shared.com/embed/1rlsRPaK/Maroon_5_-_She_Will_Be_Loved.swf

Setelah itu klik simpan saja..

Good Luck ;)